

Connect Shopify
Summary
Section titled “Summary”The Shopify tool connects your KonversAI assistant to your Shopify store. You create a custom app in the Shopify Dev Dashboard, install that app on the store, and create a Headless storefront for product search. You then add the tool on the Assistant tools screen in the KonversAI console. Select Settings in the left sidebar, then select AI tools. Once connected, the assistant searches your product catalog, answers questions about a product and its sizes, and looks up a customer’s orders and shipping status. Order and shipping answers need a verified email address from the customer. Product search does not. To let customers chat with the assistant on your store, you also paste the KonversAI chat widget snippet into your Shopify theme. You can show the widget on every page, or only on the pages you choose.
Who can do this
Section titled “Who can do this”A team member with the View tools permission opens the Assistant tools screen in the KonversAI console. A team member with the Modify tools permission adds, edits, validates and deletes the tool. A Tenant Admin holds both permissions, always. Without View tools, the item AI tools does not appear under Settings in the left sidebar. Ask a Tenant Admin to grant Modify tools on the User permissions screen. In Shopify you need permission to create an app and to install sales channels. To put the chat widget on your store, you also need permission to edit the theme code.
Before you start
Section titled “Before you start”Sign in to the KonversAI console and select your tenant. Select Settings in the left sidebar, then select AI tools. The screen heading is Assistant tools. See Give the assistant a tool for the fields every tool shares, such as Display name and Slug.
The custom app and the store must belong to the same Shopify organization. A
connection check fails when they do not. The app needs these four scopes:
read_orders, read_all_orders, read_customers and read_products. Add no
other scopes. read_all_orders is protected. Shopify may ask you to request it.
Without it, the assistant sees only the last 60 days of orders.
You also need a Storefront private token from the Headless sales channel.
The token is optional, but product search is much better with it. Copy the
private token, which starts with shpat_. Do not copy the public storefront
token, and do not copy an Admin API token. KonversAI rejects both. Publish your
products to the Headless channel. A valid token with no published products
sees an empty catalog, and product search returns nothing.
Add and enable an Email Verification tool in the same tenant. Order and shipping lookups always need a verified email, and answer No verified email found for this conversation. without one.
Create a custom app in the Shopify Dev Dashboard
Section titled “Create a custom app in the Shopify Dev Dashboard”Create a custom app in the Shopify Dev Dashboard for the store the Shopify tool should use. Start from the store admin: select Settings, then Apps, then Develop apps. The pictures below show a Norwegian admin, so each caption also gives the Norwegian button name. The app is not embedded in the Shopify admin. You release one version, then copy the Client ID and the Client secret.
-
In the Shopify admin, select Settings, then Apps. Select Develop apps.
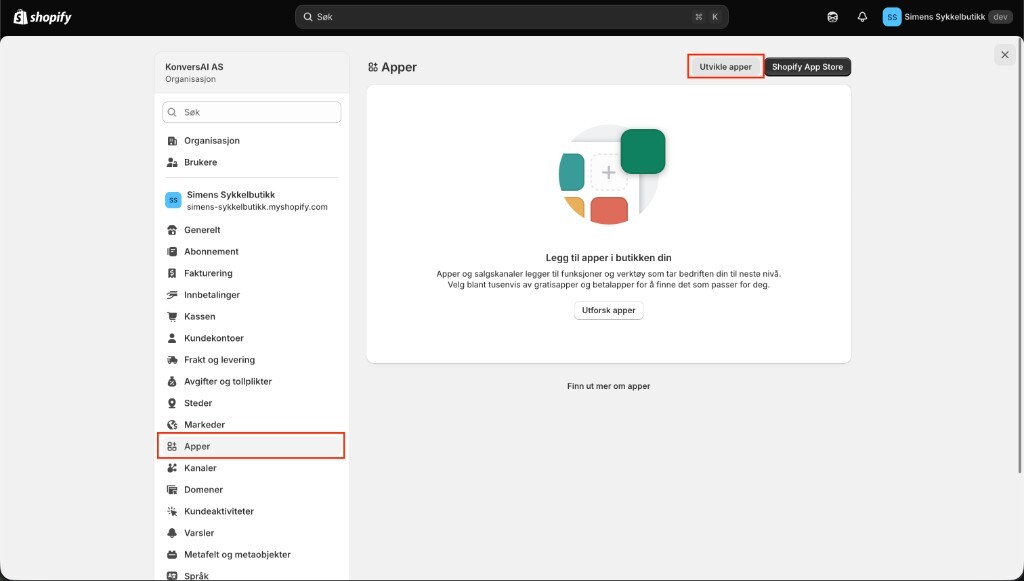
Apps. Select Develop apps. In a Norwegian admin the button reads Utvikle apper.
-
Select Create apps in Dev Dashboard.
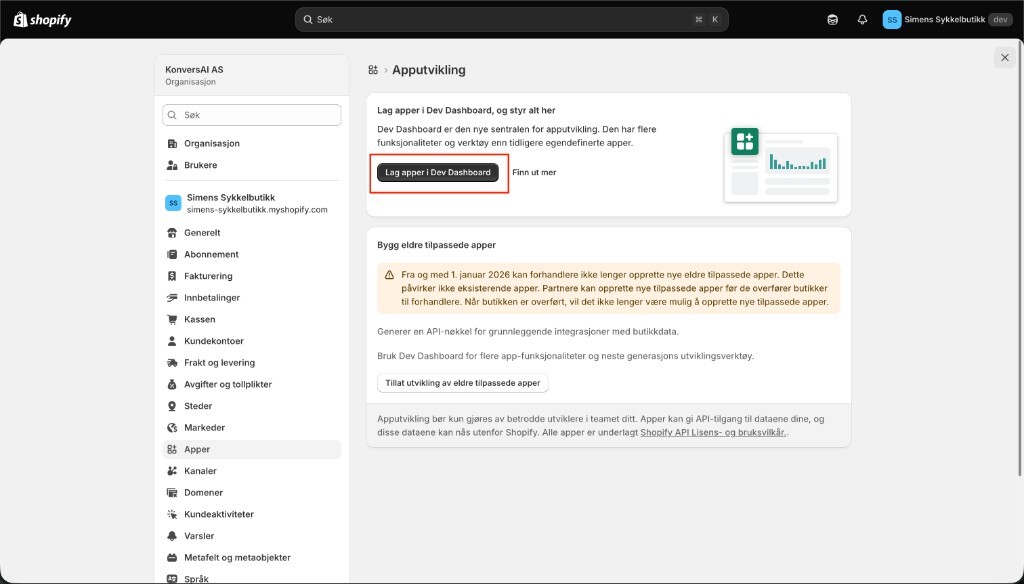
Select Create apps in Dev Dashboard. In a Norwegian admin the button reads Lag apper i Dev Dashboard.
-
In the Dev Dashboard, on Apps, select Create app.
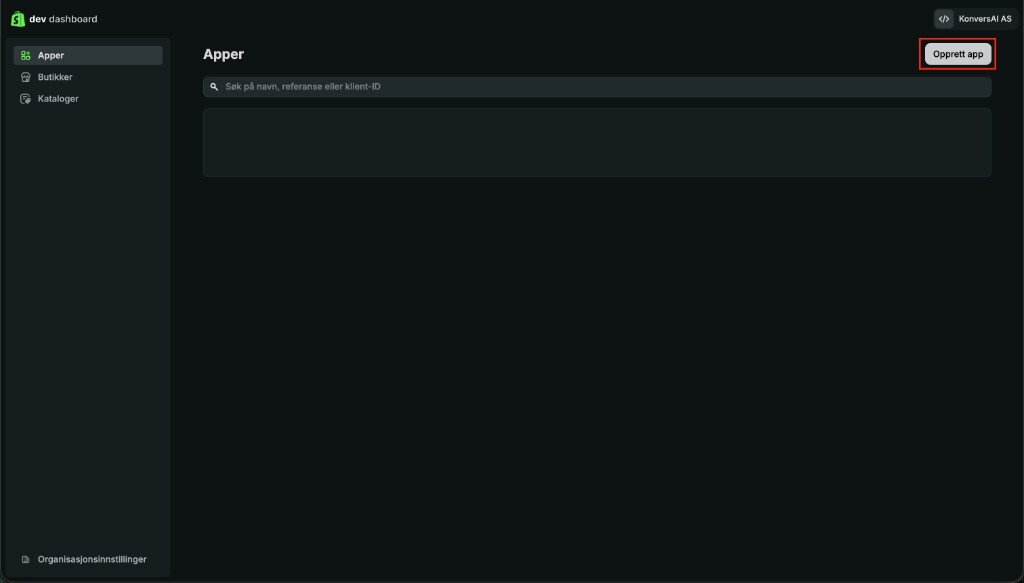
In the Dev Dashboard, select Create app. In a Norwegian admin the button reads Opprett app.
-
Under Start from Dev Dashboard, type a name in App name, then select Create app. Leave Start with Shopify CLI unused.
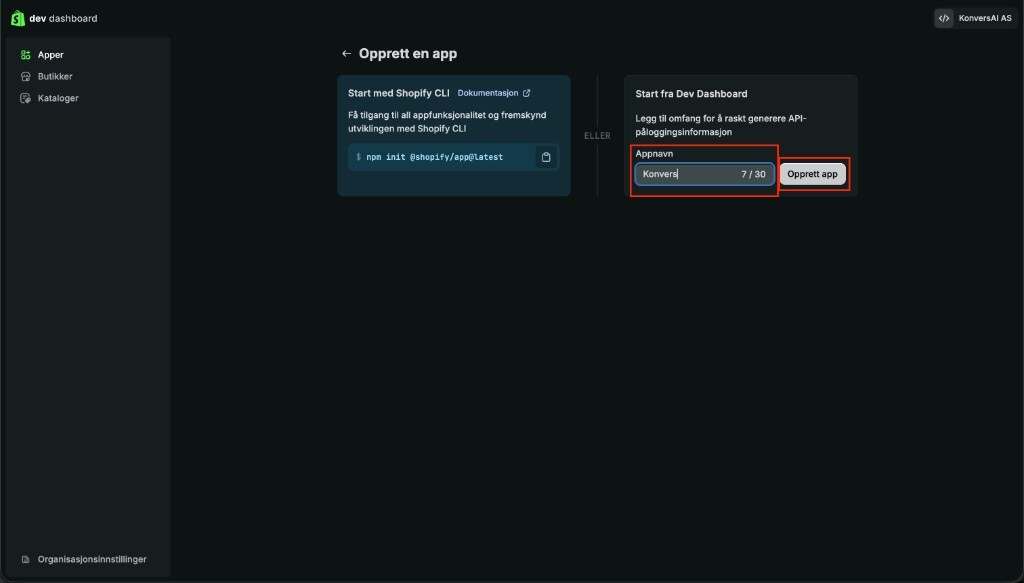
Under Start from Dev Dashboard, type an app name, then select Create app.
-
Leave the app URL and the API version as Shopify fills them in. Scroll to API access.
-
In Scopes, paste
read_orders,read_all_orders,read_customers,read_products. Add no other scopes. Shopify says some scopes need permission before a version can include them. Requestread_all_ordersfrom the Request access link when Shopify shows it. Without that scope, the assistant sees only the last 60 days of orders. Then select Release.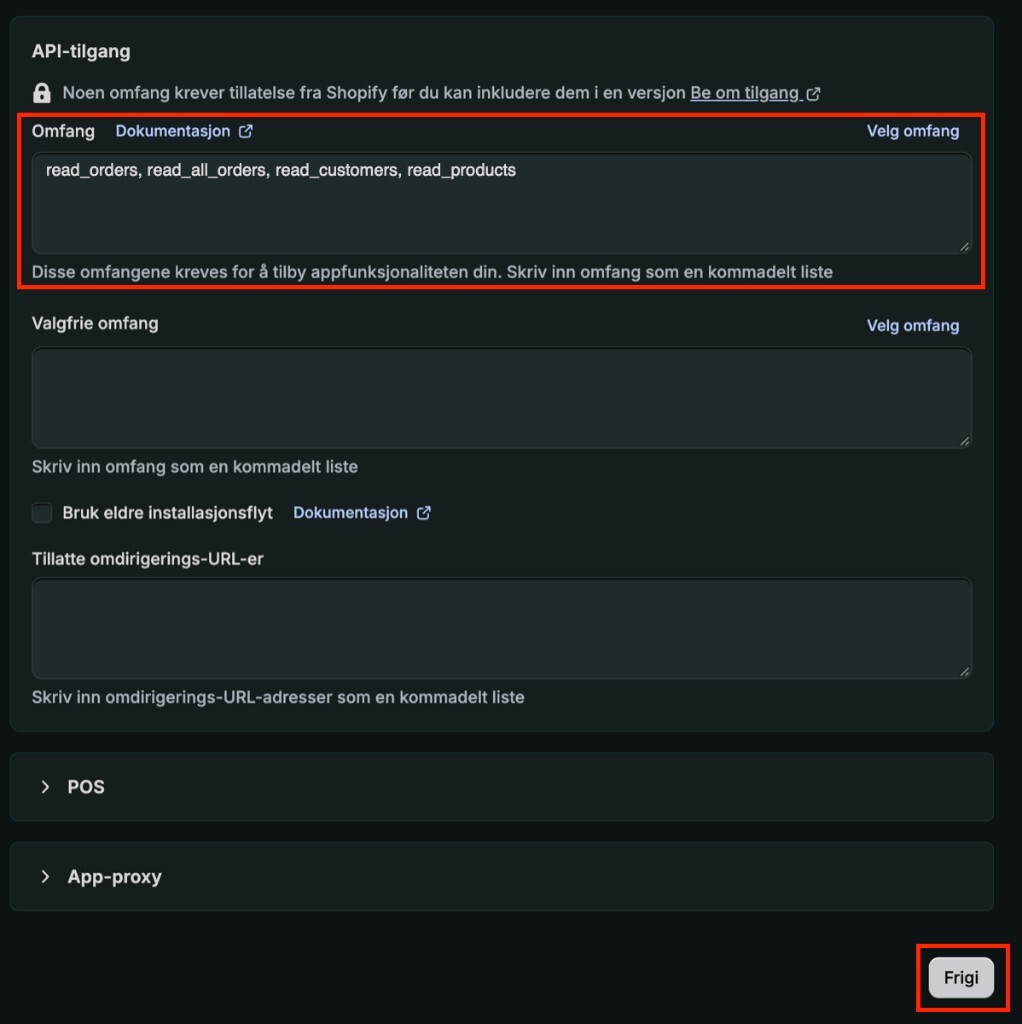
Scopes, then Release. In a Norwegian admin the labels read Omfang and Frigi.
-
In Release this new version?, leave Version name and Version message blank. Select Release.
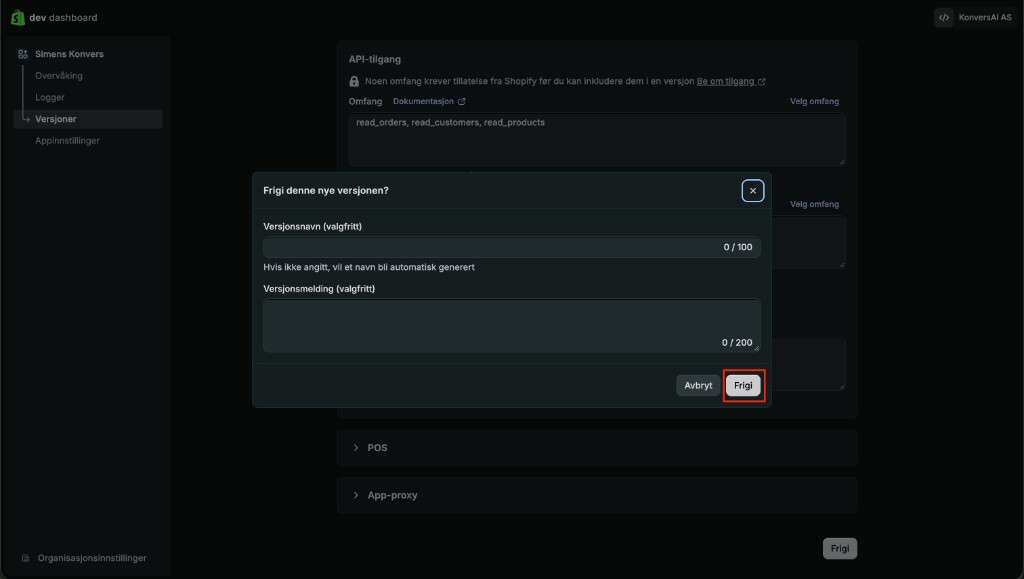
Release this new version. In a Norwegian admin the dialog reads Frigi denne nye versjonen?
-
Shopify opens Versions and marks the new version Active. Select App settings.
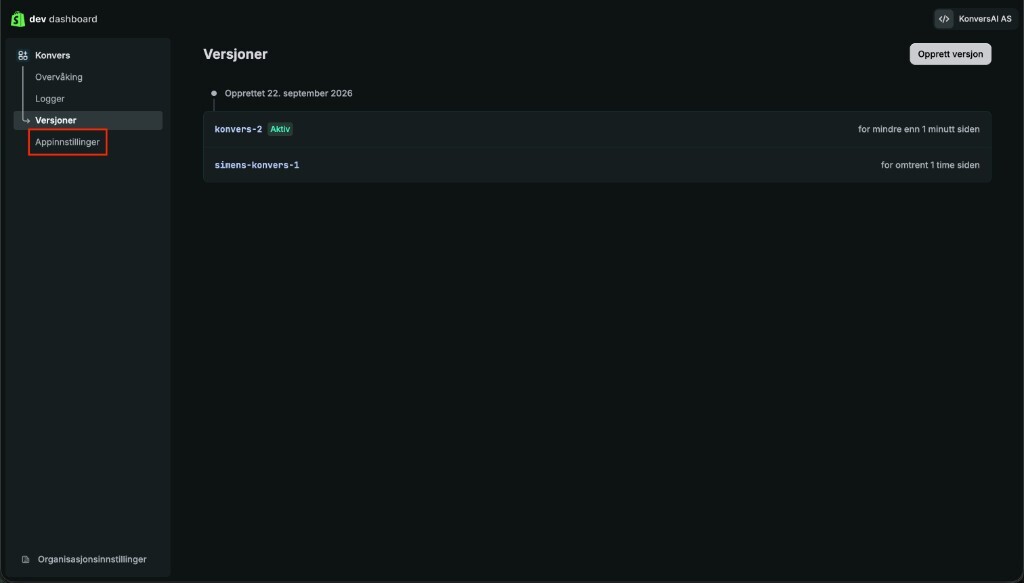
Versions. Select App settings. In a Norwegian admin the sidebar item reads Appinnstillinger.
-
Under Credentials, copy the Client ID and the Secret. Keep the Secret private. Paste the Client ID into Client ID on the Shopify tool, and paste the Secret into Client Secret.
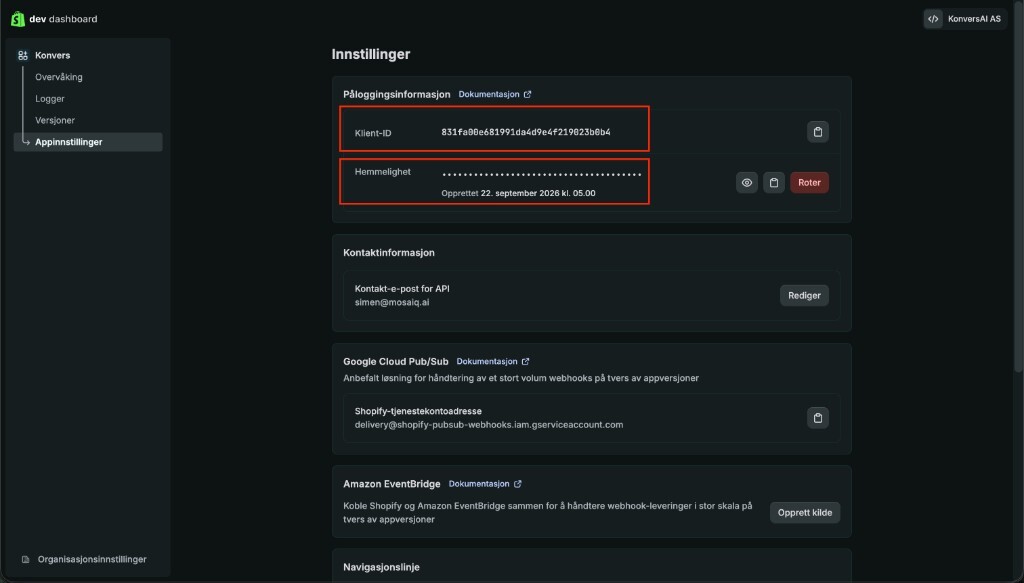
Credentials. Copy Client ID and Secret. In a Norwegian admin the labels read Klient-ID and Hemmelighet.
Install the custom app on your store
Section titled “Install the custom app on your store”Install the custom app from the Shopify Dev Dashboard onto the store KonversAI should read. The app and the store must belong to the same Shopify organization.
-
In the Dev Dashboard, select Overview. Under Installs, select Install app.
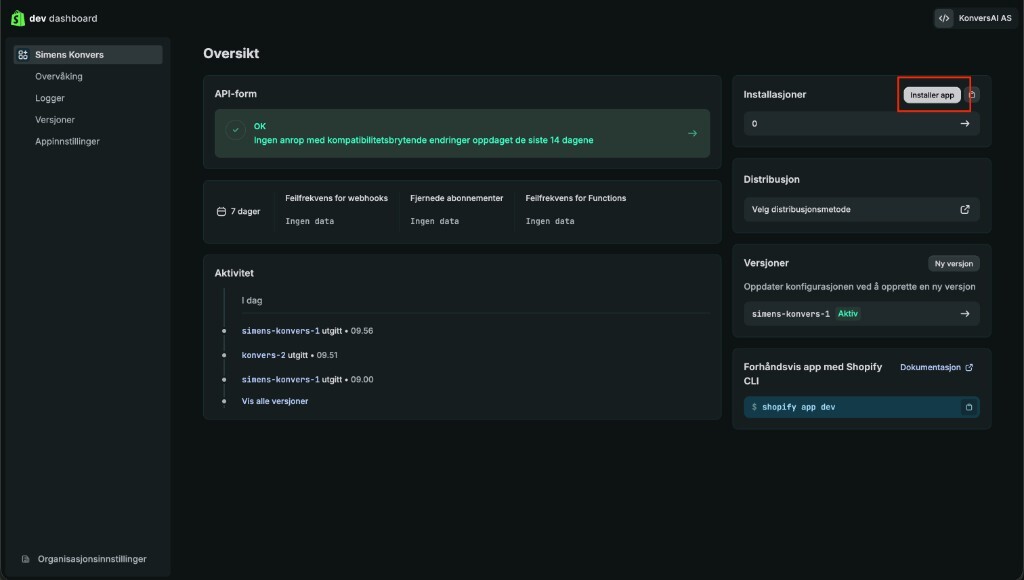
Overview. Select Install app. In a Norwegian admin the button reads Installer app.
-
Select your store, then select Install.
-
If you release a later version with new scopes, install the app again. Approve the new scopes in the Shopify admin. The new scopes apply only after that approval.
Create a Headless storefront
Section titled “Create a Headless storefront”Create a Headless storefront in the Shopify admin so you can copy a Storefront private token. Paste that token into Storefront private token on the Shopify tool in the KonversAI console. Select Settings in the left sidebar, then select AI tools, and open the tool.
-
In the Shopify admin, select Settings, then Channels. Select Shopify App Store.
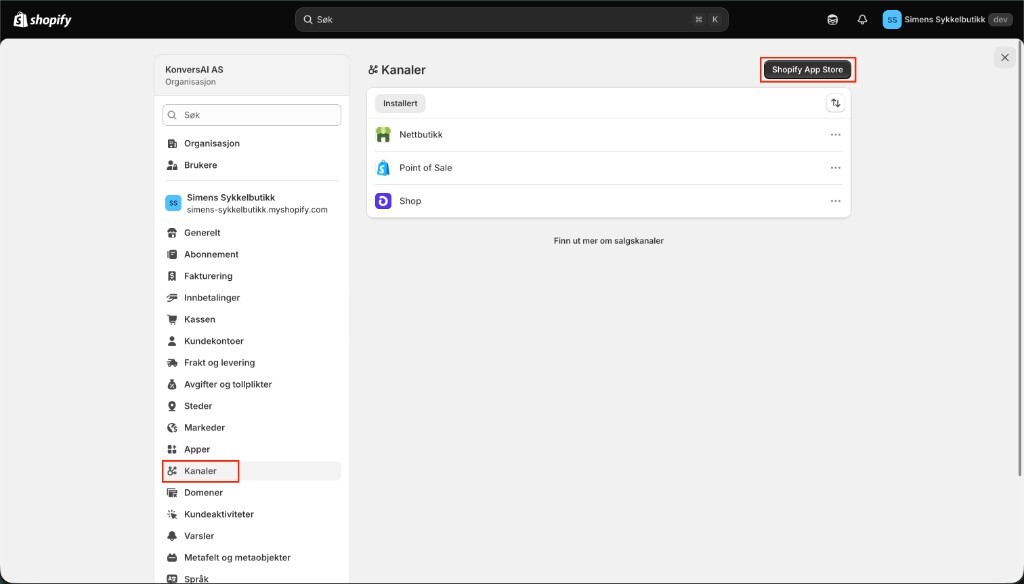
Channels. Select Shopify App Store. In a Norwegian admin the sidebar item reads Kanaler.
-
Search for Headless, then select Install.

Install Headless. In a Norwegian admin the button reads Installer.
-
Under Channels, open Headless. Select Create storefront. In a Norwegian admin the button reads Lag utstillingsvindu.
-
Open the storefront. Under Manage API access, select Manage beside Storefront API.
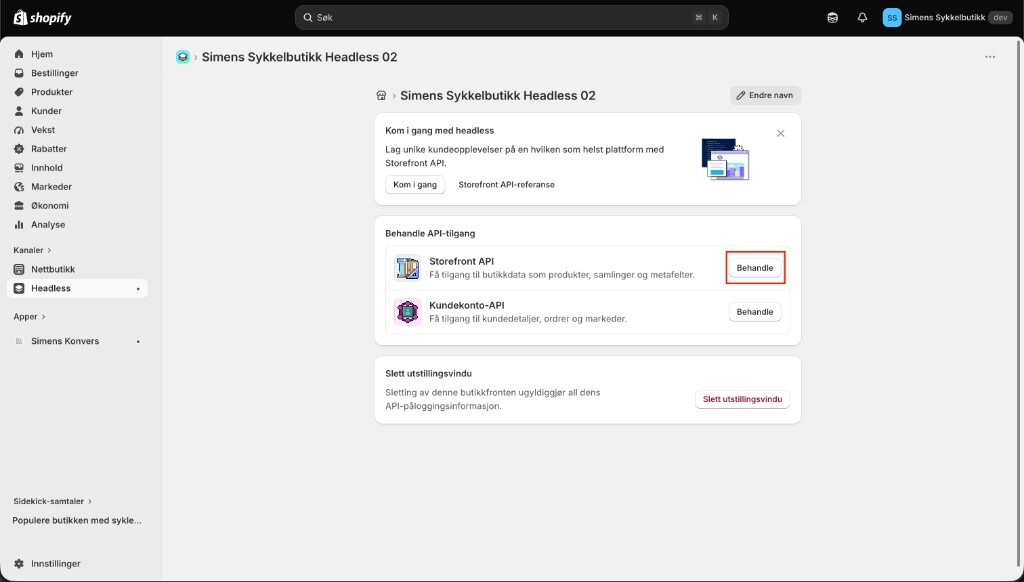
Manage beside Storefront API. In a Norwegian admin the button reads Behandle.
-
Copy the Private access token. It starts with
shpat_. Do not copy the Public access token.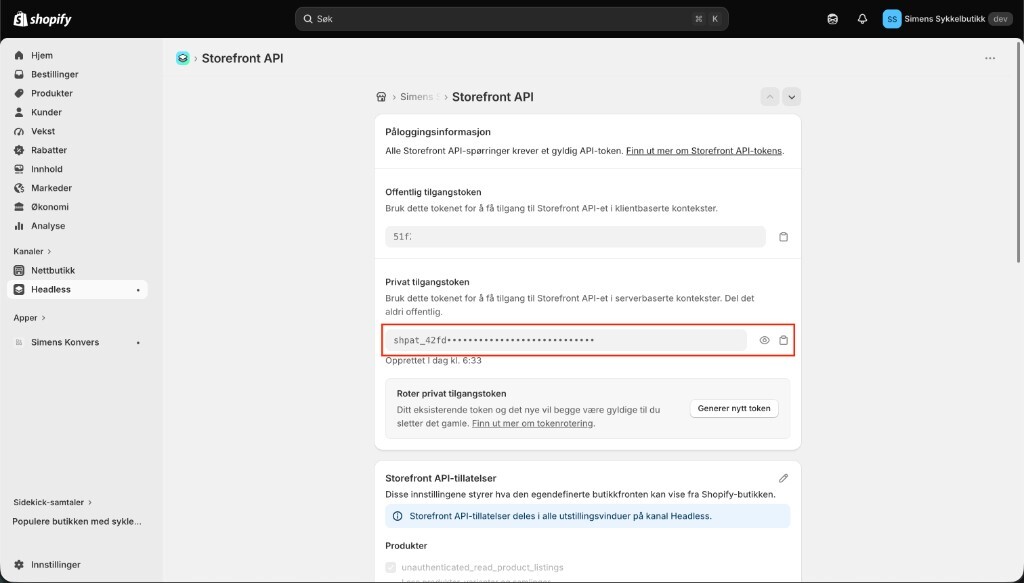
Private access token. In a Norwegian admin the label reads Privat tilgangstoken.
-
On the Storefront API page, under Storefront API permissions, keep
unauthenticated_read_product_listingsselected. Those permissions apply to every storefront on the Headless channel. -
Select Products. Select the products the assistant should find. Open …, then select Include in sales channels.
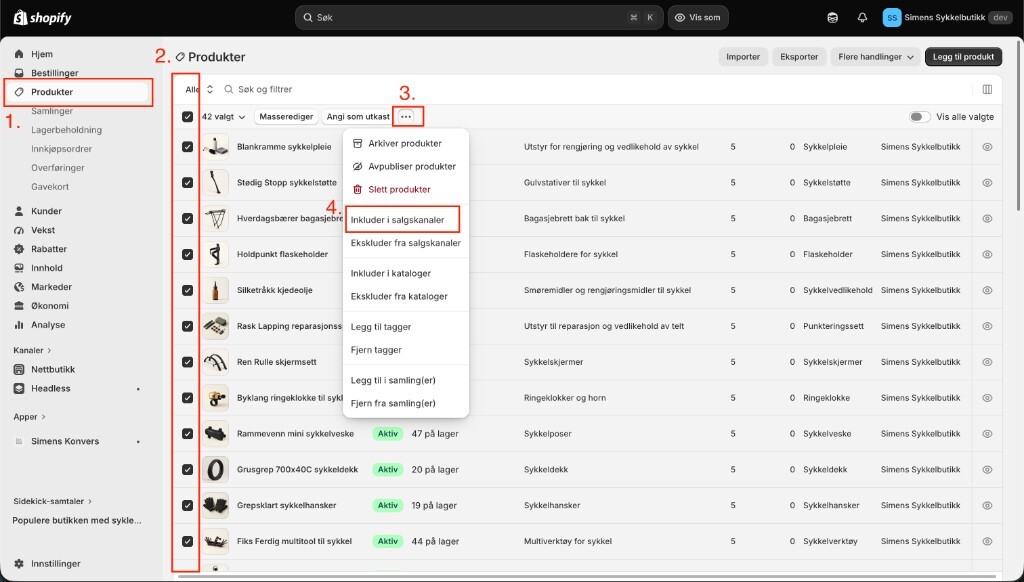
Products. Select the products, open …, then Include in sales channels. In a Norwegian admin that item reads Inkluder i salgskanaler.
-
Select Headless, then select Include products.
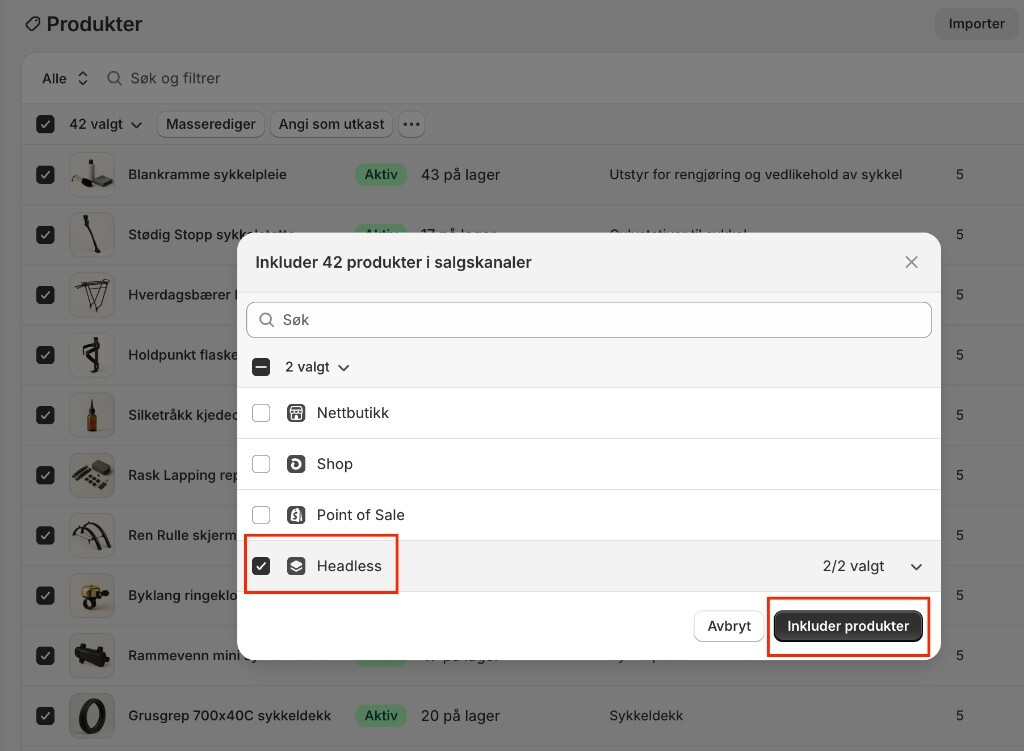
Select Headless, then Include products. In a Norwegian admin the button reads Inkluder produkter.
Add the Shopify tool in the KonversAI console
Section titled “Add the Shopify tool in the KonversAI console”Add the Shopify tool on the Assistant tools screen. Select Settings
in the left sidebar, then select AI tools. Use the Client ID, the
Client secret, and the shpat_ token you copied in Shopify.
- Select + Add tool.
- Select Shopify in Tool type. You cannot change the type later.
- Type a label in Display name, for example
Shopify. KonversAI fills Slug while you type. - Type your instruction in Usage guidance for the AI assistant, for example Use this for product questions, and for order and shipping questions once the customer’s email is verified.
- Keep the Enabled checkbox selected.
- In the Connection card, fill in:
- Shop domain — your
.myshopify.comaddress, for examplemy-store.myshopify.com. Required. - API version — the Shopify Admin API quarterly release, for example
2026-01. Keep the value KonversAI fills in unless Shopify asks you to change it.
- Shop domain — your
- Select Add secret on Client ID. In the Add secret window, paste the Client ID into Secret value, then select Apply. Do the same for Client Secret.
- Add Storefront private token the same way, with the
shpat_token from Headless. You can skip this secret. Product search is worse without it. - Select Test connection. On a new tool, KonversAI saves the tool first, then opens it with the heading Edit tool. A success banner starts with Shopify settings are valid. and then names your shop, your app, the API version, the granted scopes, and whether storefront search is active.
- Read any warning under the banner. A warning still lets you continue, but the assistant answers worse until you fix it.
- After a successful test, fill in the remaining cards:
- Kiwi Sizing size guides — turn this on only when your store uses the Kiwi Sizing app for its size guides.
- Storefront API version — leave blank. Fill it in only when the Storefront API version must differ from API version.
- Size guide metafield — leave blank unless your store keeps size guides
in a product metafield. Then type it as
namespace.key, for examplecustom.size_guide. - Store country and Store language — usually leave both blank. On
your Shopify store, the chat widget detects the market and language the
visitor is browsing by itself. These two fields are only the fallback
when no store page is involved, for example an email conversation or a
headless storefront. Type the country as an ISO code such as
NOand the language as an ISO code such asNB. Fill in both or neither.
- Select Save changes. KonversAI shows Validating…, then the same style of banner as Test connection.
Put the chat widget on your Shopify store
Section titled “Put the chat widget on your Shopify store”The chat widget is a <script> snippet. Shopify has no app to install for it.
Copy the snippet from the KonversAI console, then paste it once into your
Shopify theme so the chat button loads on every storefront page. Do this in the
published theme, the one customers see.
- In the KonversAI console, select Settings in the left sidebar, then select Entry-points. Select the Chat tab.
- Add and save a chat entry point, or open a saved one. KonversAI only shows Embed code on a saved entry point.
- Open Embed code, then copy the whole snippet. Always copy it from the console. Do not type the key or the address by hand.
- In the Shopify admin, select Online Store (Nettbutikk), then Edit Themes (Rediger Tema). On your published theme, open the … menu and select Edit code (Rediger Kode).
- Open
layout/theme.liquid. Paste the snippet once, just before the closing</body>tag. - Select Save.
- Open your live storefront in a new browser tab. The chat button appears in the corner. Check the live storefront, not only the theme editor preview.
The snippet has this shape. The console fills in the real address and key for your workspace.
<script async src="https://your-chat-service.example.com/static/widget/bubble.js" data-tenant-key="YOUR_REFERENCE_KEY" data-api-base="https://your-chat-service.example.com"></script>If your theme has a Custom Liquid section or a footer scripts field, you can
paste the snippet there once instead. Do not change data-tenant-key or
data-api-base. You do not paste the snippet again when you change the widget
colours in Size and Colors on the entry point. For the full install steps and
how to test the widget, see Install the widget on your
website.
Show the chat widget on only some pages
Section titled “Show the chat widget on only some pages”By default the snippet in layout/theme.liquid loads the chat button on every
storefront page. To limit the button to some pages, wrap the snippet in a Shopify
Liquid condition on the template name. Every Shopify page uses one template, and
layout/theme.liquid can read its name. The button then loads only when the
condition is true.
- Put the widget snippet in your theme first. In the KonversAI console, select
Settings, then Entry-points, then the Chat tab. Open Embed code
on a saved chat entry point and copy the snippet. In the Shopify admin, select
Online Store, then Themes. Open the … menu on your published
theme and select Edit code. Open
layout/theme.liquid. - Find the snippet you pasted just before the closing
</body>tag. Add an{% if %}line above the snippet and an{% endif %}line below it. - Write the condition. This example shows the button on collection pages and product pages only:
{% if template.name == 'collection' or template.name == 'product' %}<script async src="https://your-chat-service.example.com/static/widget/bubble.js" data-tenant-key="YOUR_REFERENCE_KEY" data-api-base="https://your-chat-service.example.com"></script>{% endif %}- Keep the real
src,data-tenant-keyanddata-api-basevalues from your own Embed code. Change only the{% if %}line. - Select Save.
- Open a page that matches the condition on your live storefront. The chat button appears. Open a page that does not match, such as the home page. The chat button does not appear.
Use these values for template.name:
| Page | template.name |
|---|---|
| Home page | index |
| Product page | product |
Collection page, including the all-products page at /collections/all |
collection |
| List of all collections | list-collections |
| Content page, such as About us | page |
| Cart | cart |
| Search results | search |
| Blog | blog |
| Blog post | article |
Join conditions with or to match several page types. To match one collection
only, use {% if template.name == 'collection' and collection.handle == 'summer-sale' %}
with your own collection handle. To match one content page only, use
{% if template.name == 'page' and page.handle == 'about-us' %} with your own
page handle. For the full install steps, see Install the widget on your
website.
What can the assistant do once Shopify is connected?
Section titled “What can the assistant do once Shopify is connected?”The Shopify tool gives your KonversAI assistant five abilities. It searches your product catalog, fetches the full description of one product, and fetches a product’s size guide with the sizes that are in stock. It also lists the customer’s five most recent orders, and reports fulfillment and tracking for one order. Add the tool on the Assistant tools screen in the KonversAI console: select Settings in the left sidebar, then select AI tools. The two order abilities need a verified email address; the three product abilities do not.
Why does the assistant refuse to look up an order?
Section titled “Why does the assistant refuse to look up an order?”Most often because the conversation has no verified email address. The Shopify tool answers No verified email found for this conversation. and asks the customer to verify. This is deliberate: it stops one customer reading another customer’s orders. Add and enable an Email Verification tool in the same tenant, on the Assistant tools screen in the KonversAI console. Select Settings in the left sidebar, then select AI tools, then select + Add tool, and select Email Verification in Tool type.
Do I really need the Storefront private token?
Section titled “Do I really need the Storefront private token?”Not to save the tool, but product search is noticeably worse without it. With
the token, search runs on the same engine as your store’s own search bar, which
ranks results by relevance and copes with a multi-word question. Without it,
search falls back to a plain catalog filter that requires every word to match,
so a phrase a customer would actually type often returns nothing. The banner
says Storefront search: not configured. when the token is missing. Get the
token from the Headless channel in the Shopify admin: select Settings,
then Channels, select Shopify App Store, and install Headless. Under
Channels, open Headless and select Create storefront. In a Norwegian
admin that button reads Lag utstillingsvindu. Copy the private token, which
starts with shpat_. Paste it into Storefront private token on the
Shopify tool in the KonversAI console.
The banner says the Client ID or Client Secret was rejected. What now?
Section titled “The banner says the Client ID or Client Secret was rejected. What now?”The banner reads Shopify connection check failed: the Client ID or Client Secret was rejected. Verify credentials in the Shopify Dev Dashboard and confirm the app and store belong to the same Shopify organization. Open the app in the Shopify Dev Dashboard, select Settings, and copy the Client ID and the Client secret again from Credentials. Confirm you selected Release, then Install app on that same store. Open the Shopify tool in the KonversAI console — select Settings in the left sidebar, then AI tools — and replace both secrets in the Connection card. Select Test connection. KonversAI never shows a stored secret again, so replace the value rather than trying to read it.
The banner warns that the storefront token was rejected. What did I copy?
Section titled “The banner warns that the storefront token was rejected. What did I copy?”The warning says The storefront private token was rejected. Shopify has
three different tokens and only one works here. Copy the Storefront API private
access token, which starts with shpat_. The public storefront token and the
Admin API token both fail. In the Shopify admin, open Headless under
Channels, open the storefront, and select Manage beside Storefront
API. Copy Private access token. Then replace
Storefront private token in the Connection card of the Shopify tool
in the KonversAI console. Select Settings in the left sidebar, then AI
tools, and open the tool. Select Test connection again.
Product search returns nothing, but my products exist. Why?
Section titled “Product search returns nothing, but my products exist. Why?”Two causes are common. The banner warns The storefront private token is valid but no products are visible to it. when your products are not published to the Headless channel. In the Shopify admin, select Products, select the products, open …, then select Include in sales channels. Select Headless, then select Include products. The second cause is a multi-language store without a Storefront private token. The assistant searches in the visitor’s market and language only with that token. Without it, search uses your store’s primary language and misses products named in another language. Paste the token into Storefront private token on the Shopify tool in the KonversAI console. Open the tool from Settings, then AI tools.
How do I put the chat widget on my Shopify store?
Section titled “How do I put the chat widget on my Shopify store?”Copy the snippet from Embed code, then paste it once into your Shopify
theme. In the KonversAI console, select Settings in the left sidebar, then
Entry-points, then the Chat tab. Open Embed code on a saved chat
entry point and copy the whole snippet. In the Shopify admin, select Online
Store, then Themes. Open the … menu on your published theme and select
Edit code. Open layout/theme.liquid, paste the snippet just before the
closing </body> tag, and select Save. Shopify has no app to install for the
widget.
The chat button does not show on my Shopify store. What do I check?
Section titled “The chat button does not show on my Shopify store. What do I check?”Check these four things, in this order. First, open your live storefront, not
only the theme editor preview. Second, make sure you edited the published theme.
A snippet pasted into a theme that is not published never reaches customers.
Third, make sure the snippet in layout/theme.liquid is complete, with both
data-tenant-key and data-api-base, and appears once just before </body>.
Fourth, hard-refresh the page to skip a cached copy. If the button is still
missing, see Install the widget on your
website for the browser console warnings to look
for.
I changed my Shopify theme and the chat button disappeared. Why?
Section titled “I changed my Shopify theme and the chat button disappeared. Why?”The snippet lives in your theme code, so a new theme does not have it. Publish
the new theme, then paste the snippet again into its layout/theme.liquid. Copy
the snippet from Embed code on your chat entry point: select Settings,
then Entry-points, then the Chat tab. Shopify also keeps old themes, so
the change takes effect only on the theme you publish.
Can I show the chat widget on only some pages of my Shopify store?
Section titled “Can I show the chat widget on only some pages of my Shopify store?”Yes. In the Shopify admin, select Online Store, then Themes, open the
… menu on your published theme, and select Edit code. Open
layout/theme.liquid. Wrap the chat widget snippet in a Liquid condition on the
template name. For example, add {% if template.name == 'collection' or template.name == 'product' %} above the snippet and {% endif %} below it. The
chat button then loads only on collection pages and product pages. Select
Save, then check one matching page and one other page on your live
storefront. Copy the snippet from Embed code at Settings, then
Entry-points, on the Chat tab.
My store sells in several countries. Do I need one widget per market?
Section titled “My store sells in several countries. Do I need one widget per market?”No. One chat widget covers every market of your Shopify store. The widget reads
the market the visitor is browsing from the store page: the country chosen in
your store’s country selector, or the domain the visitor is on. The assistant
then shows products, prices and links from that market, in that market’s
language. A product the market does not sell is not offered. When a visitor
switches market during a chat, the next answer follows the new market. This
needs the Storefront private token on the Shopify tool, and Shop
domain set to your myshopify.com address. Store country and Store
language are only a fallback, for conversations with no store page, such as
email.
Where do size guides come from?
Section titled “Where do size guides come from?”The Shopify tool looks in three places, in order. It first reads the product metafield you named in Size guide metafield, if you set one. It then asks the Kiwi Sizing app, if you turned on Kiwi Sizing size guides. It finally looks for a table in the product description. When it finds none, the assistant says the store publishes no size chart for the product and answers from the list of sizes and their stock instead. Open the tool in the KonversAI console to change this: select Settings in the left sidebar, then AI tools. These fields appear after Test connection succeeds.
Why does the customer’s contact card show Amount spent and RFM group?
Section titled “Why does the customer’s contact card show Amount spent and RFM group?”The Shopify tool fills in the contact card in the KonversAI console when the
conversation has an email address that matches a Shopify customer. The card shows
Amount spent, Orders, Customer since and RFM group, and the
customer’s name. The Capabilities column on the Assistant tools screen
shows a Contact info badge on the tool row for this reason. See Find a
customer contact. These values reach
your team in the console only, never the customer. The custom app needs the
read_customers scope for this. Add that scope, select Release, install the
app again, and select Test connection on the Shopify tool.
How far back can the assistant see orders?
Section titled “How far back can the assistant see orders?”That depends on one Shopify scope. With read_all_orders on your custom app,
the assistant reaches your full order history. Without it, Shopify itself limits
the app to the last 60 days, and older orders look as if they do not exist.
read_all_orders is a protected scope: request it on the app version in the
Shopify Dev Dashboard, select Release, then install the app again and
approve the new scopes. The banner on the Shopify tool in the KonversAI
console lists Granted scopes, so you can check what your app actually holds.
Select Test connection to refresh that list.
Last reviewed . Tell us when a step no longer matches the product.