

Give the assistant a tool
Summary
Section titled “Summary”A tool lets your KonversAI assistant do something, not only write an answer. You manage tools on the Assistant tools screen in the KonversAI console. Select Settings in the left sidebar, then select AI tools. The screen heading is Assistant tools. The help text on the screen says: Configure which tools the assistant can use in this tenant. Each tool instance has a unique slug used by the assistant to call it. Tools are tenant-wide. Every tool you enable is available to the assistant in every conversation in the tenant.
For a short list of what each Tool type does, see See available integrations. This page is the shared add, edit, validate, disable and delete flow.
Who can do this
Section titled “Who can do this”A team member with the View tools permission opens the Assistant tools screen in the KonversAI console. A team member with the Modify tools permission adds, edits, validates, deletes and discovers. A Tenant Admin holds both permissions, always. Without View tools, the item AI tools does not appear under Settings in the left sidebar. With View tools only, you can open the add form, but KonversAI refuses the save with a permission error. Ask a Tenant Admin to grant Modify tools on the User permissions screen.
Before you start
Section titled “Before you start”Sign in to the KonversAI console and select your tenant. Select Settings in the left sidebar, then select AI tools. The screen heading is Assistant tools.
The Assistant tools screen is not behind a feature flag. Some individual tools need one. Calendar Booking (built-in) works only when your tenant has the Calendar feature. That tool answers Calendar is not enabled for this workspace. when the feature is off.
Collect what the tool needs before you start the form. A webhook URL, an API key or a server URL is easier to paste than to find halfway through.
These are the tool types you can add today. The Tool type list shows them in this order. For a short description of each type, see See available integrations.
| Tool type | Tool set type | What it does |
|---|---|---|
| Knowledge Base Search | knowledgebase |
Searches your published knowledge base and returns the matching text. |
| Email Verification | email_verification |
Sends a code to the customer email address and checks the reply. |
| Phone Verification | phone_verification |
Sends a code to the customer phone number and checks the reply. |
| Handover | handover |
Passes the conversation to a person, and emails the contacts you list. |
| Calendar Booking | ical_booking |
Reads free slots from an external iCal URL and emails an invitation. See Set up the Calendar Booking tool. |
| Calendar Booking (built-in) | calendar_booking |
Books, finds and cancels in the KonversAI Calendar. Needs the Calendar feature. |
| Slack Notifications | slack |
Posts a message to a Slack incoming webhook. |
| Skykontoret CRM | skykontoret_crm |
Looks up a contact, checks membership, and creates a support case. |
| Shopify | shopify |
Searches the product catalog, and looks up an order and its shipping status in a Shopify shop. See Connect Shopify. |
| Posten / Bring parcel tracking | bring_tracking |
Looks up the delivery status of a parcel sent with Posten or Bring. |
| Yayloh returns | yayloh |
Lists the returns registered in Yayloh for a customer, and shares a return shipping label. See Connect Yayloh returns. |
| HubSpot CRM | hubspot |
Looks up a HubSpot contact and creates a support ticket. See Connect HubSpot. |
| Yr Weather | yr_weather |
Returns a yr.no forecast for a location you configure. See Set up the Yr Weather tool. |
| BookVisit | bookvisit |
Looks up a BookVisit booking and adds or removes its add-ons. |
| MCP Server | mcp_server |
Connects to an MCP server (optionally via OAuth Connect) and uses the functions it publishes. |
-
Select Settings in the left sidebar of the KonversAI console, then select AI tools. The screen opens with the heading Assistant tools.
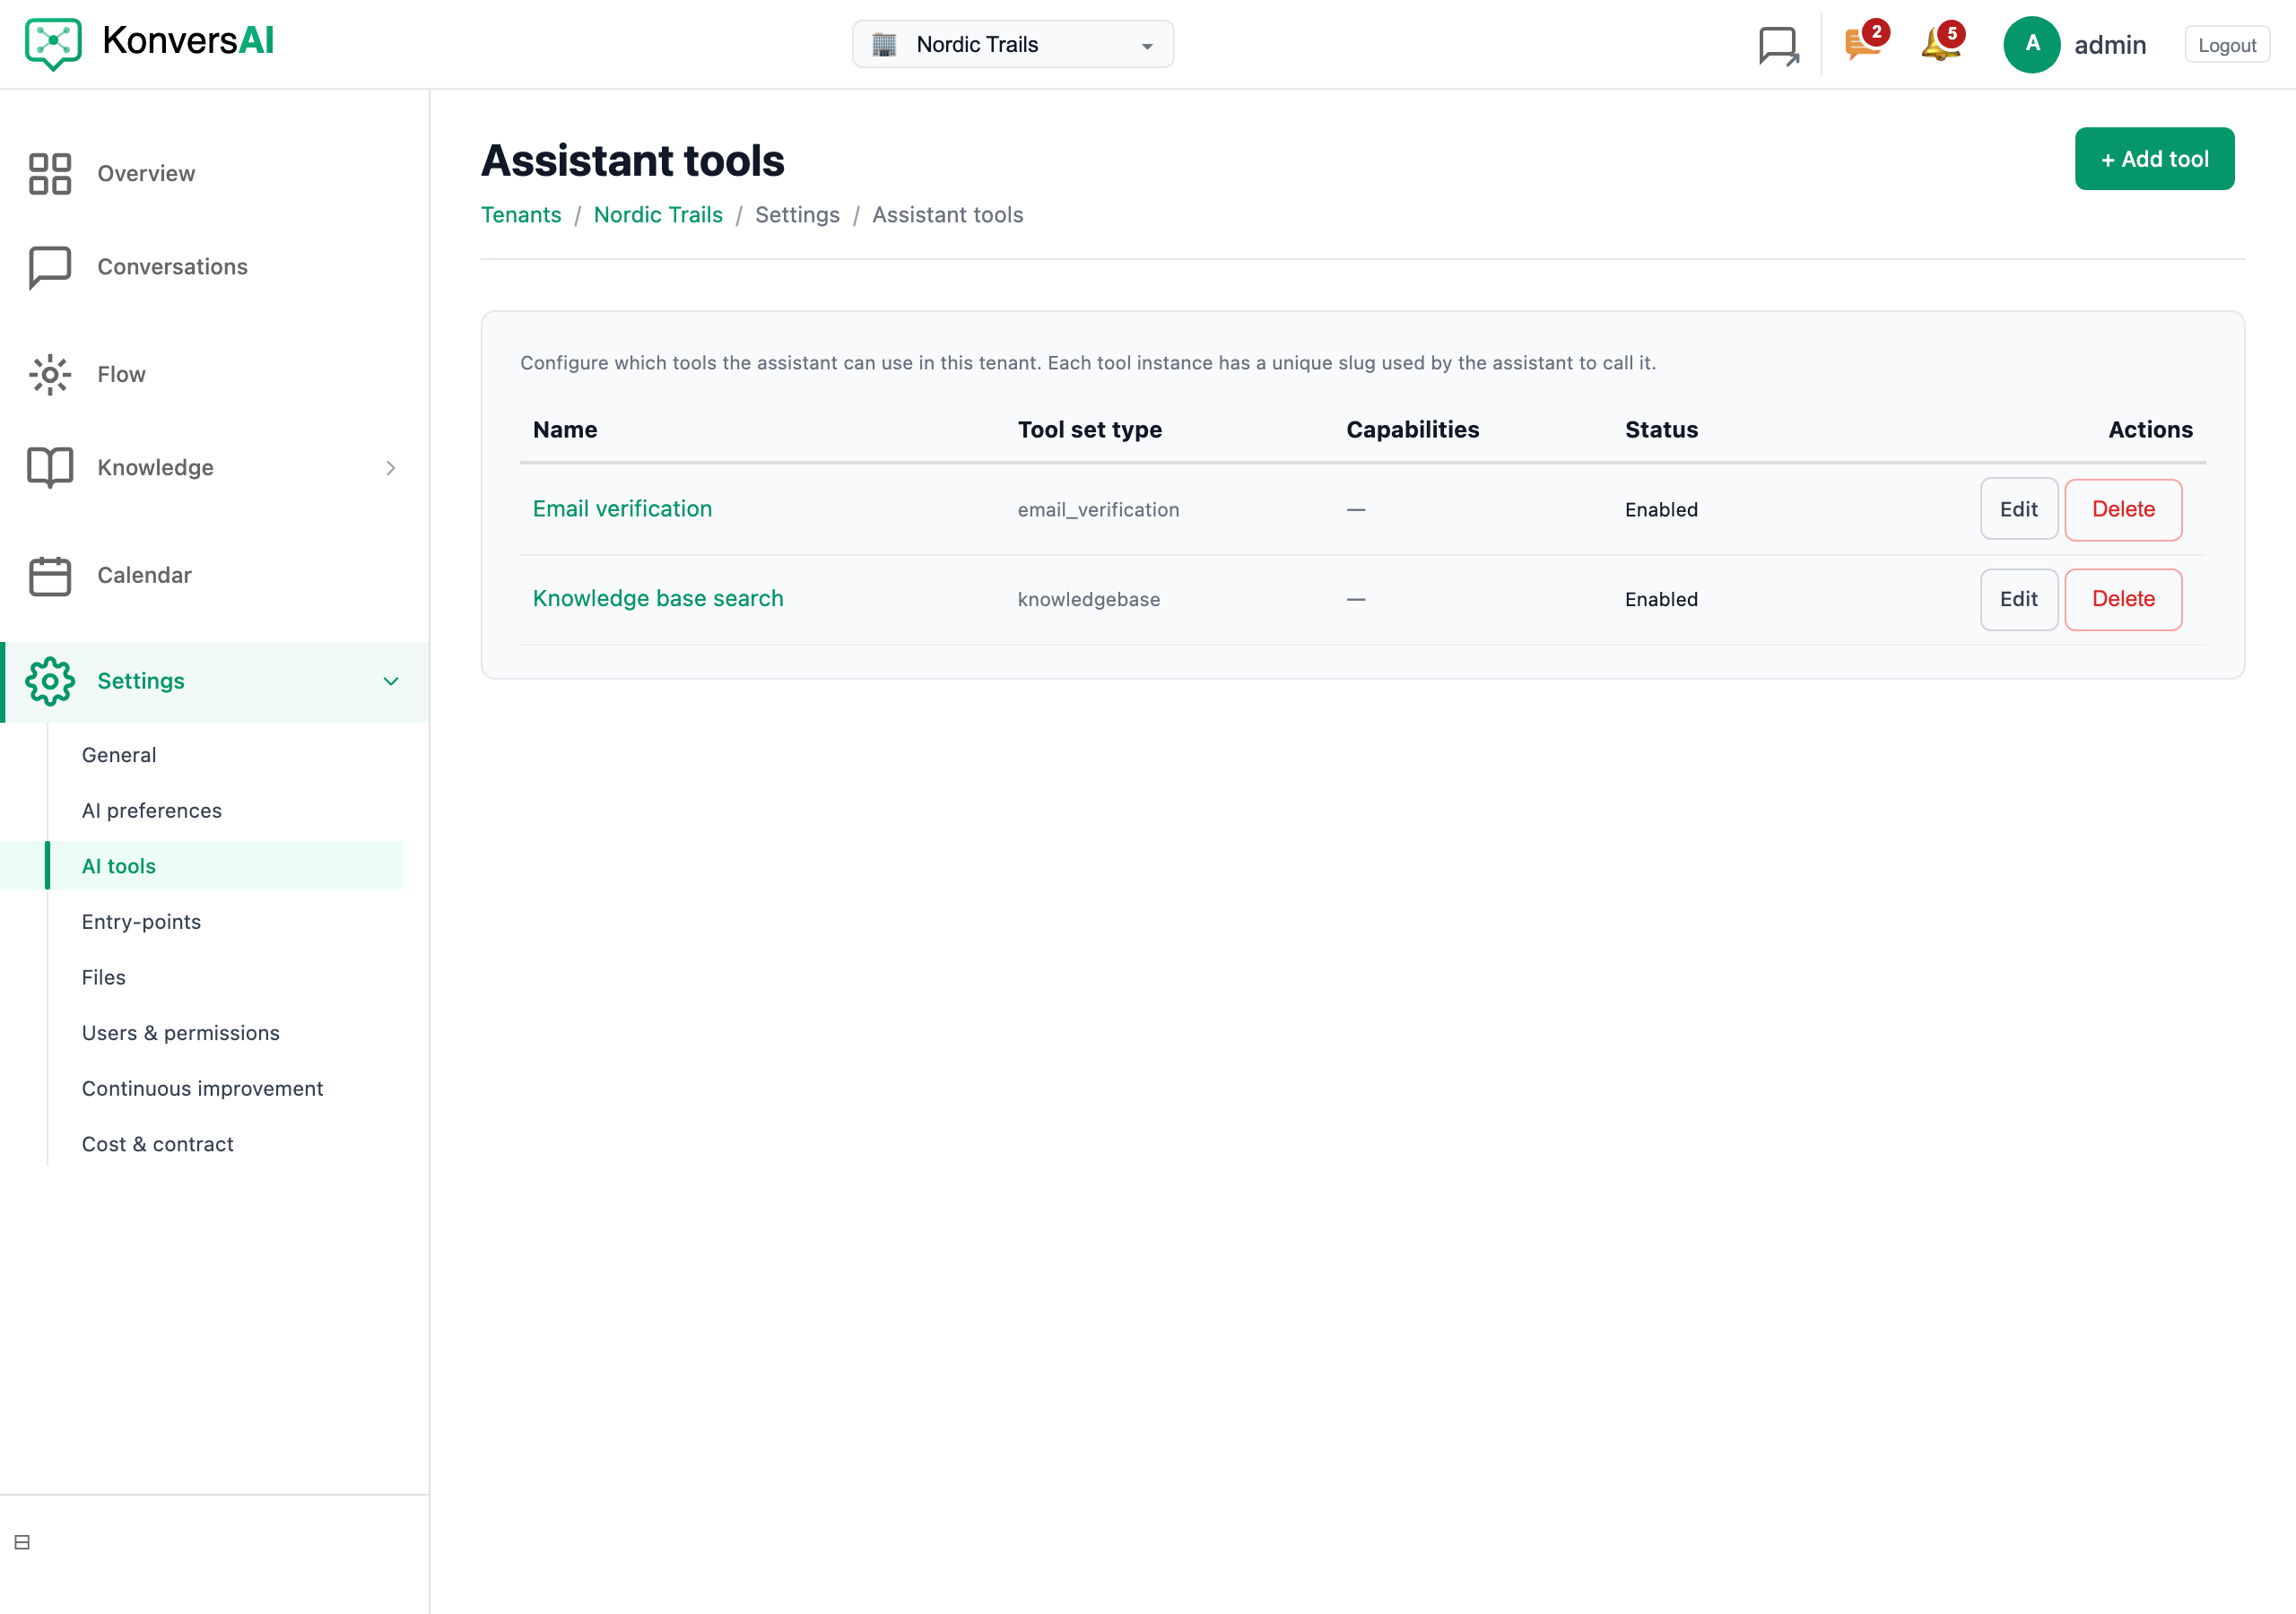
Assistant tools. Each row is one tool the assistant can call.
-
Read the table. The columns are Name, Tool set type, Capabilities, Status and Actions. Name is your own label, and it links to the tool. Tool set type shows the technical type, such as
slack. Capabilities shows a badge for Contact info or Handover, and a dash (—) when the tool has neither. Status shows Enabled or Disabled. An empty tenant shows No tool configurations yet. Add one to get started. -
Select + Add tool at the top right. The form opens with the heading Add tool.
-
Select the type in Tool type. The list starts with the placeholder — Select a tool —. You cannot change the type later: the edit screen disables the list and says Tool type cannot be changed when editing.
-
Type a label in Display name. This label is what the Name column shows. KonversAI fills Slug from Display name while you type.
-
Check Slug. The assistant calls the tool by this slug, so keep it short and readable. The help text says: Unique ID used by the assistant to call this tool. Letters, numbers, underscores, hyphens only (1–64 chars). The slug must be unique inside your tenant. KonversAI refuses a double underscore with Slug must not contain double underscores (‘__’); this delimiter is reserved for multi-function tool naming.
-
Type your instruction in Usage guidance for the AI assistant. The placeholder says: When to use this tool, and how eagerly to use it. KonversAI puts this text in the assistant prompt, next to the tool name. Say when to use the tool, and when not to.
-
Keep the Enabled checkbox selected. Clear it to save the tool without giving it to the assistant.
-
Fill in the Configuration card. This card appears only for a type that needs settings, and each field carries its own label and help text. A sensitive field, such as a webhook URL, shows dots instead of the text.
-
Fill in the Secrets card, when the type has one. The card lists each secret with Name, Status and Actions. Status is Not set or Configured. Select Add secret to open the small window, type the value in Value, then select Apply. On a saved tool the button is Update, and the window saves with Save secret.
-
Select Add tool at the bottom. KonversAI saves the tool and opens it again with the heading Edit tool.
-
Select Validate and save. KonversAI checks the settings against the real service and shows the result in a banner. Only the edit screen has this button.
Worked example: notify your team on Slack
Section titled “Worked example: notify your team on Slack”This example adds one Slack Notifications tool in the KonversAI console. The assistant then posts a message into a Slack channel when a conversation needs a person. Select Settings in the left sidebar, then select AI tools, to start.
- Create an incoming webhook in Slack first, and copy its URL. Slack gives you a
URL that starts with
https://hooks.slack.com/. - Select Settings in the left sidebar of the KonversAI console, then select AI tools. Select + Add tool.
- Select Slack Notifications in Tool type.
- Type
Slack Notificationsin Display name. KonversAI fills Slug withslack_notifications. - Type your instruction in Usage guidance for the AI assistant. For example: Use this when the customer asks for a person, or when I cannot answer and the customer is unhappy.
- Leave the Enabled checkbox selected.
- Paste the webhook URL into Slack webhook URL in the Configuration card. The box hides the text, because the URL is a secret.
- Check Message template in the Configuration card. The default text is
A conversation needs attention: {conversation_link}. Keep{conversation_link}in the text. KonversAI replaces it with a link to the conversation. - Select Add tool. The screen reopens with the heading Edit tool.
- Select Validate and save. A green banner with Slack settings are valid. means Slack accepted your settings.
- Open a test conversation in your widget and ask for a person. The message arrives in your Slack channel with a link back to the conversation.
The assistant calls this tool at most once per conversation, so a customer cannot flood your channel.
Three errors can appear in the banner. webhook_url is required. means the
Slack webhook URL box is empty. webhook_url must be a valid HTTP(S) URL.
means the text is not an http:// or https:// address. slack_message_content
must include {conversation_link}. means you removed {conversation_link} from
Message template.
What is an assistant tool, and why does my assistant need one?
Section titled “What is an assistant tool, and why does my assistant need one?”A tool lets your KonversAI assistant act, not only write. You manage tools on the Assistant tools screen in the KonversAI console: select Settings in the left sidebar, then select AI tools. Without a tool, the assistant can only write text from its instructions and its knowledge base. With a tool, it can search your knowledge base, verify an email address, book a slot, look up an order, or post to Slack. Each tool you add is one configured instance of a tool type. The assistant sees the tool by its Slug, and reads your Usage guidance for the AI assistant to decide when to call it.
Which tool types can I add?
Section titled “Which tool types can I add?”The Tool type list on the add form in the KonversAI console holds every type in the table above. Select Settings in the left sidebar, then select AI tools, then select + Add tool, to see it. For short descriptions and which types have a dedicated how-to, see See available integrations. For HubSpot CRM, see Connect HubSpot. For Calendar Booking, see Set up the Calendar Booking tool. For Yr Weather, see Set up the Yr Weather tool. For Shopify, see Connect Shopify. For Yayloh returns, see Connect Yayloh returns. You can add the same type more than once, with a different Slug each time. For example, you can add two Yr Weather tools for two different sets of locations.
KonversAI refuses my slug. What is allowed?
Section titled “KonversAI refuses my slug. What is allowed?”Slug on the add form in the KonversAI console has three rules. Select
Settings in the left sidebar, then select AI tools, then select + Add
tool, to reach the field. The help text under the box says: Unique ID used by
the assistant to call this tool. Letters, numbers, underscores, hyphens only
(1–64 chars). KonversAI shows Slug must be 1-64 characters and contain only
letters, digits, underscores, or hyphens. for a bad character. It shows Slug
must not contain double underscores (‘__’); this delimiter is reserved for
multi-function tool naming. for a __ inside the slug. The slug must also be
unique inside your tenant. KonversAI fills the slug from Display name while
you add a tool, and stops filling it after the first save.
What do I write in Usage guidance for the AI assistant?
Section titled “What do I write in Usage guidance for the AI assistant?”Usage guidance for the AI assistant is a free text box on the add form in the KonversAI console. Select Settings in the left sidebar, then select AI tools, then open a tool, to find it. KonversAI copies your text into the assistant prompt, beside the tool name. Write when to call the tool and when to leave it alone. The placeholder gives the shape: When to use this tool, and how eagerly to use it. Two good sentences beat one long paragraph. Leave the box empty, and the assistant uses only the built-in description of the tool.
How do I turn a tool off without deleting it?
Section titled “How do I turn a tool off without deleting it?”Clear the Enabled checkbox on the tool. Select Settings in the left sidebar of the KonversAI console, select AI tools, then select the tool name in the Name column. Clear Enabled, then select Save changes. The Status column on the Assistant tools screen then shows Disabled, and the assistant stops seeing that tool at once. Your settings and your secrets stay in place. Select the checkbox again and select Save changes to bring the tool back.
Where do I put an API key or a password?
Section titled “Where do I put an API key or a password?”It depends on the tool type. Select Settings in the left sidebar of the KonversAI console, then select AI tools, then open the tool. Shopify, Posten / Bring parcel tracking, Yayloh returns, BookVisit, Skykontoret CRM and HubSpot CRM have a Secrets card. See Connect Shopify and Connect Yayloh returns for what to put in those two. Each row there shows Name, Status and Actions, with Not set or Configured. Select Add secret, type the value in Value, then select Apply on a new tool or Save secret on a saved tool. On a saved tool the secret saves immediately, because the card says Changes are saved immediately. Other types, such as Slack Notifications, keep the sensitive value in the Configuration card in a box that hides the text. KonversAI never shows a stored secret again — you can only replace it.
How do I connect an MCP server with OAuth?
Section titled “How do I connect an MCP server with OAuth?”Many remote MCP servers (for example consumer or SaaS MCP endpoints) use the standard MCP OAuth flow. On the MCP Server edit screen, enter the MCP server URL, save the tool, then select Connect. KonversAI opens the provider’s login page in your browser. After you approve access, you return to the tool screen with a success message and KonversAI stores tokens for the tenant and discovers the server’s tools.
Use Reconnect if the connection expires, or Disconnect to clear stored tokens. Servers that do not support OAuth can still use Static authentication (JSON) under configuration (bearer token, custom header, and similar).
The MCP Server tool points outwards: your KonversAI assistant calls somebody else’s MCP server while it answers a customer. KonversAI also publishes an MCP server of its own, which points the other way — your MCP client manages your KonversAI workspace. See Connect an MCP client.
What does the Discover button do?
Section titled “What does the Discover button do?”Discover appears in the Actions column of the Assistant tools screen in the KonversAI console, on MCP Server rows only. Select Settings in the left sidebar, then select AI tools, to see the table. An MCP server publishes its own list of functions, so KonversAI has to ask the server what it can do. Discover asks again and stores the fresh list. Use it after somebody changes the MCP server. KonversAI also discovers once by itself, right after you add the MCP Server tool (when the server allows unauthenticated discovery or you already connected with OAuth). A failure shows Failed to discover tools or the message from the server. If the server requires OAuth, connect first, then run Discover.
What happens when I delete a tool?
Section titled “What happens when I delete a tool?”Select Delete in the Actions column of the Assistant tools screen in the KonversAI console. Select Settings in the left sidebar, then select AI tools, to reach the table. A window opens with the heading Delete tool configuration? and the text This cannot be undone. The assistant will no longer be able to use this tool. Select Delete to confirm, or Cancel to keep the tool. The delete removes the settings and the secrets with the tool. To stop a tool for a short time instead, open the tool, clear the Enabled checkbox, and select Save changes.
What is the difference between Calendar Booking and Calendar Booking (built-in)?
Section titled “What is the difference between Calendar Booking and Calendar Booking (built-in)?”Both appear in the Tool type list on the add form in the KonversAI console. Select Settings in the left sidebar, then select AI tools, then select + Add tool, to compare them. Calendar Booking (built-in) uses the KonversAI Calendar: it reads your calendars, creates a booking, finds a booking by reference, and cancels one. It needs the Calendar feature on your tenant, and answers Calendar is not enabled for this workspace. without it. Calendar Booking is the simpler external option: you give it a Calendar URL, an Invite email, a Timezone, a Booking start hour, a Booking end hour and a Meeting duration (minutes), and it emails an invitation for a free slot it reads from that URL.
Last reviewed . Tell us when a step no longer matches the product.