

Install the widget on your website
Summary
Section titled “Summary”The KonversAI chat widget is a chat button that sits on your website. A
customer selects the button and talks to your KonversAI assistant. You get the
embed code on the Customer entry points page in the KonversAI console, at
Settings > Entry-points, on the Chat tab. You copy one <script>
tag and paste the tag into the HTML of your website. You need somebody who can
edit your website HTML, because KonversAI cannot install the widget for you.
Who can do this
Section titled “Who can do this”In the KonversAI console, you need a role with tenant settings access. If you do not see Settings in the left sidebar of the console, you do not have this access. Ask a tenant administrator to change your role.
On your website, you also need a person who can edit the HTML, or who can paste a script into your content management system. The two jobs can be two different people.
Before you start
Section titled “Before you start”You need a login to the KonversAI console, and a role with tenant settings access. The embed code lives at Settings > Entry-points, on the Chat tab.
You need a way to add a <script> tag to your website HTML. Most content
management systems have a field for custom HTML, custom scripts or a footer
snippet.
Add knowledge first. The KonversAI assistant answers from your knowledge base only. Add at least one source at Knowledge > Import in the console before you put the widget in front of customers. Without knowledge, the assistant has nothing to answer with.
-
Select Settings in the left sidebar of the KonversAI console, then select Entry-points. The page Customer entry points opens.
-
Select the Chat tab. The Chat tab lists your chat entry points.
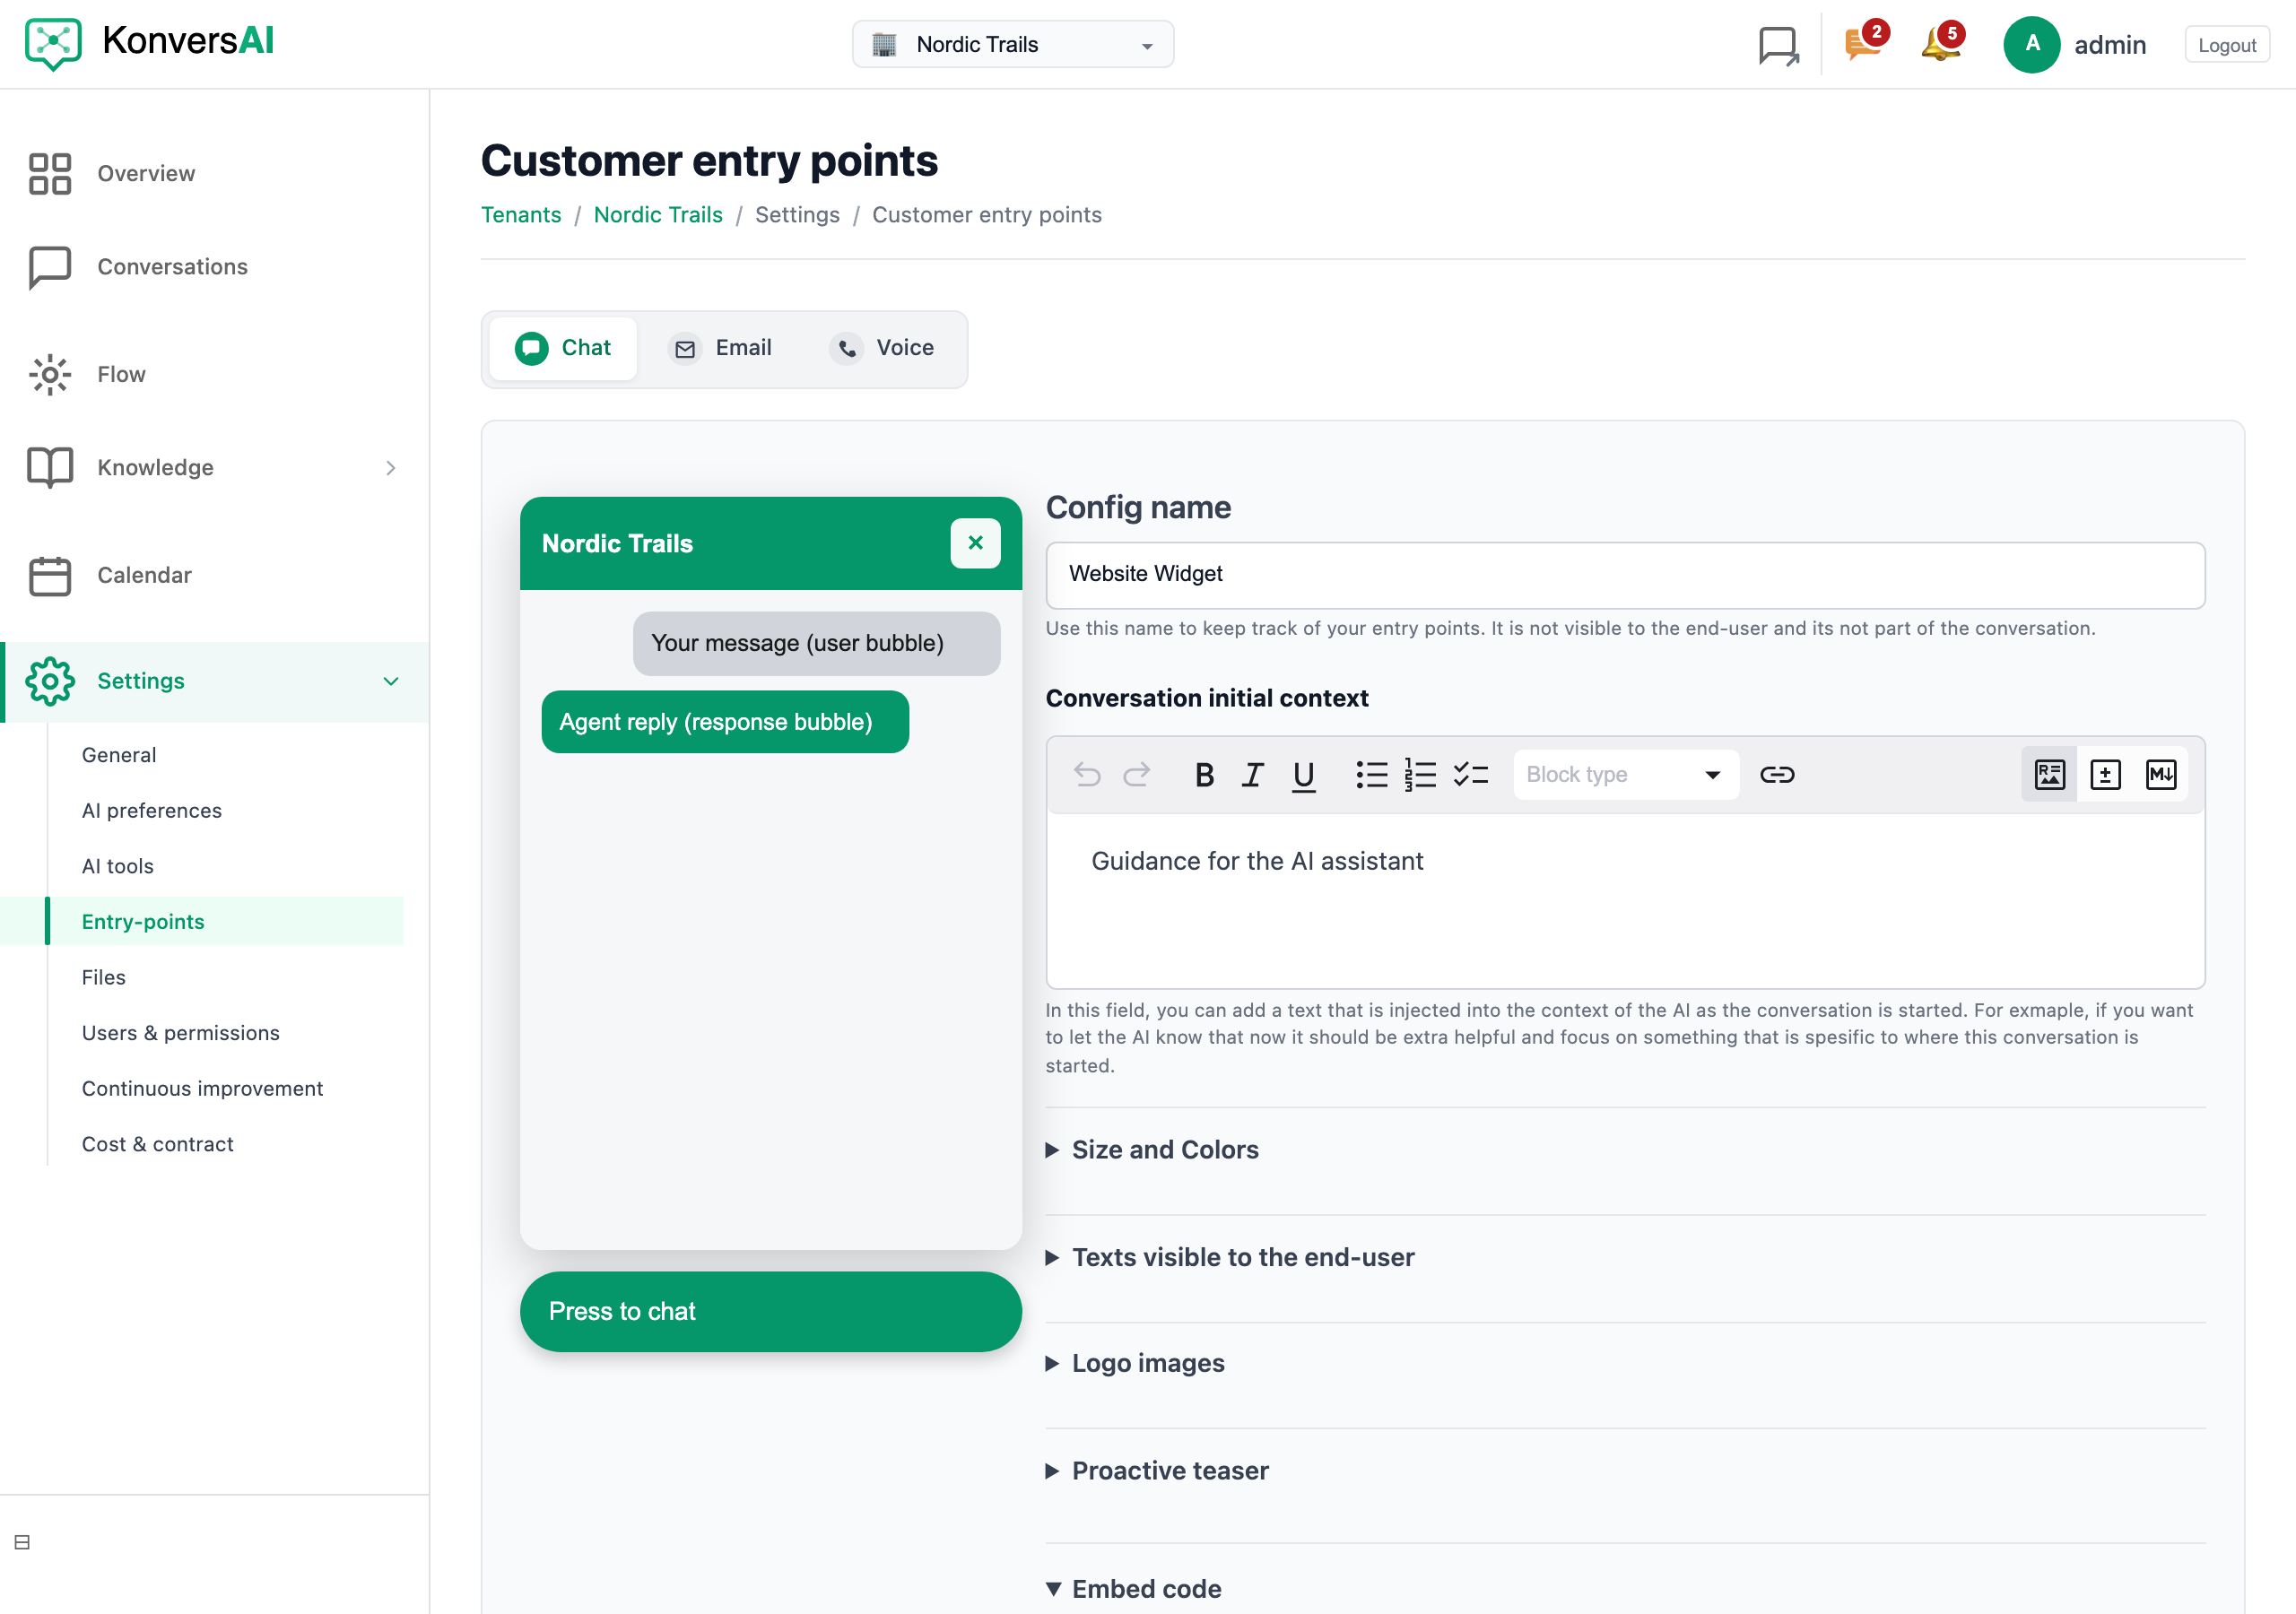
The Chat tab. The Embed code section holds the snippet you paste into your website.
-
Select the + button below the list to add a chat entry point. A window opens.
-
Type a name in Config name. The name is mandatory, and the maximum length is 255 characters. Only your team reads this name. Customers never see the name, and KonversAI does not put the name into the conversation.
-
Optional: type guidance for the assistant in Conversation initial context. KonversAI adds this text to the assistant context when a customer starts a conversation from this widget.
-
Optional: open Size and Colors to set Closed launcher size and the widget colours. Watch the preview beside the form as you change a value.
-
Select Create config. KonversAI saves the entry point and closes the window.
-
Find the saved entry point in the list, then open Embed code. KonversAI only shows Embed code on a saved entry point. Embed code is not in the create window, so you must save the entry point first.
-
Select the snippet in the Embed code box. One select highlights the whole snippet. Copy the snippet. The console text beside the box tells you: Copy this snippet and paste it into the HTML of your own website.
-
Paste the snippet into the HTML of every page where you want the chat button. Paste the snippet once per page, just before the closing
</body>tag. The script tag has theasyncattribute, so the script does not slow down your page. -
Publish your website, then open a page in a browser. The chat button appears in the corner of the page.
-
Back in the console, select Test this widget on the same entry point. KonversAI opens a demo page with your widget, so you can test the widget without touching your website.
The snippet has this shape. The console fills in the real address and the real key for your workspace, so always copy the snippet from Embed code instead of typing the snippet by hand.
<script async src="https://your-chat-service.example.com/static/widget/bubble.js" data-tenant-key="YOUR_REFERENCE_KEY" data-api-base="https://your-chat-service.example.com"></script>The data-tenant-key attribute tells KonversAI which workspace and which entry
point the conversation belongs to. The data-api-base attribute tells the
widget which KonversAI server to talk to. Do not change either value.
Where do I find the embed code?
Section titled “Where do I find the embed code?”In the KonversAI console, select Settings in the left sidebar, then select Entry-points. The page Customer entry points opens. Select the Chat tab, find your chat entry point in the list, then open Embed code. Select the snippet in the box to highlight the whole snippet, then copy the snippet.
I created a new entry point but I cannot find Embed code. Why?
Section titled “I created a new entry point but I cannot find Embed code. Why?”KonversAI only shows Embed code on a saved entry point. The window where you create an entry point has no Embed code section. Type a name in Config name, select Create config, then find the new entry point in the list on the Chat tab at Settings > Entry-points. Embed code is there.
Where in my HTML does the snippet go?
Section titled “Where in my HTML does the snippet go?”Paste the snippet into the HTML of each page where you want the chat button,
once per page, just before the closing </body> tag. The script tag has the
async attribute, so the position does not hold up your page. If your content
management system has a footer snippet field or a custom scripts field, paste
the snippet there once, and the field adds the snippet to every page.
I pasted the snippet but no chat button appears. What do I check?
Section titled “I pasted the snippet but no chat button appears. What do I check?”Check these four things, in this order. First, make sure the page you loaded is
the published page and not a cached copy. Second, open the browser developer
console and look for the warning [Widget WS] Could not load chat availability; launcher hidden. — this warning means the browser could not reach the
KonversAI server, so check that data-api-base is correct and reachable.
Third, make sure the snippet is complete, with both data-tenant-key and
data-api-base. The widget stops without a message when either attribute is
missing. Fourth, contact KonversAI support: the widget also hides itself when
your workspace does not allow anonymous conversations, or when your contract
does not currently allow conversations.
Can I put the widget on more than one page or more than one site?
Section titled “Can I put the widget on more than one page or more than one site?”Yes. Paste the same snippet on as many pages as you want. The widget draws one chat button per page, and a second copy of the snippet on the same page does nothing. To tell traffic apart, or to give a different look or different guidance to a different site, create a second chat entry point at Settings
Entry-points on the Chat tab. Each entry point has its own
data-tenant-keyvalue in its own Embed code.
Can I put the chat inside the page instead of a floating button?
Section titled “Can I put the chat inside the page instead of a floating button?”Yes. KonversAI has a second loader script, inline.js, that puts the chat
inside an element that you choose. The inline loader needs a data-target
attribute with a CSS selector for that element. Without data-target, the
browser console shows [Widget Inline] data-target attribute is required. and
the chat does not appear. The Embed code box gives you the floating-button
version, so ask KonversAI support for the inline version.
Do I need to change the snippet when I change the colours?
Section titled “Do I need to change the snippet when I change the colours?”No. Open Size and Colors on your chat entry point at Settings > Entry-points, change the values, then select Save. The widget reads the new look from KonversAI the next time a customer loads your page. Leave the snippet on your website exactly as you pasted the snippet.
Can I style the widget with my own CSS or JavaScript instead of the console?
Section titled “Can I style the widget with my own CSS or JavaScript instead of the console?”Technically yes, because the widget places its own elements directly on your page rather than inside an isolated frame. We do not recommend this. When you override the look with your own site code, the colours, logo and text you set in Size and Colors stop matching what a customer actually sees, and your override can break without warning the next time KonversAI updates the widget. Use Size and Colors at Settings > Entry-points, on the Chat tab, for every look change, so the console stays a true picture of what customers see. You take on the risk of an override yourself.
Does the widget load anything from outside my site?
Section titled “Does the widget load anything from outside my site?”Yes. The one-line embed snippet only names your KonversAI address, but the widget then loads more from that address and from one third-party CDN.
From the KonversAI address in data-api-base, the widget loads its JavaScript,
its stylesheet, and logo images. It also opens HTTPS requests and a websocket
to that same address so chat messages can flow.
From cdn.jsdelivr.net, the widget loads a small text-formatting library used
for assistant replies. That address is not in the embed snippet.
If your website has a Content Security Policy, allow your KonversAI address for
scripts, styles, images, and network connections (including the websocket).
Also allow cdn.jsdelivr.net for scripts. If you block only cdn.jsdelivr.net,
the chat button still appears, but assistant messages show as raw text instead
of formatted text. If you block the KonversAI address, the chat button may not
appear at all.
How do I test the widget before customers see it?
Section titled “How do I test the widget before customers see it?”Use Test this widget in the KonversAI console. Select Settings in the left sidebar, then Entry-points, then the Chat tab. Find your chat entry point and select Test this widget. KonversAI opens a demo page with your widget on it. The demo page uses the same assistant and the same knowledge base as your website, so you can ask real customer questions without changing your website.
Last reviewed . Tell us when a step no longer matches the product.